Back in the days (you remember web 2.0? 😉) I used to do a lot of programming around photos. Resizing, scaling, rotating and converting between formats. Recently, I had to create a web service that generates watermarked images using Vapor. It turns out that there are not very many libraries for image manipulation yet, so this simple task became an interesting problem to research.
There are two major image manipulation libraries: GD and ImageMagick. ImageMagick is a bit of an advanced library so I decided to go with this one first. There is an interesting Swift wrapper for ImageMagick called MagickWand. Unfortunately, it doesn’t support text manipulation at all so I had to dig deeper. I couldn’t find anything useful so I thought “why not to just use some ImageMagick C functions in Swift?” It turns out that this is quite easy to do!
If you are just interested in one particular topic, feel free to use links below:
Install ImageMagick
In the develop section on ImageMagick website you can find documentation for MagickWand and MagickCore. Those are the interfaces written in C for interacting with ImageMagick processing libraries. Wrapping it in a Swift package is very easy, but first let’s install ImageMagick.
Let’s start with macOS. You can compile ImageMagick by yourself but for macOS it’s easier just to use Homebrew.
➜ brew install imagemagick@6
If you don’t specify @6 it will install the latest version by default. I had issues with version 7 on Linux so I decided to use older versions for both macOS and Linux.
After the installation you will notice that homebrew is not creating symlinks (more information about: keg-only dependencies). This part is important in order to get information that you need about ImageMagick:
For pkg-config to find imagemagick@6 you may need to set:
export PKG_CONFIG_PATH="/usr/local/opt/imagemagick@6/lib/pkgconfig"
You can just add PKG_CONFIG_PATH in terminal before each pkg-config command but it’s easier to add it permanently, if you are using zsh just run:
➜ echo 'export PKG_CONFIG_PATH="/usr/local/opt/imagemagick@6/lib/pkgconfig:$PKG_CONFIG_PATH"' >> ~/.zshrc
For Linux I’m using Ubuntu 18.04 with Swift 4.2. If you have pre installed ImageMagick it’s better to remove it before compiling:
➜ apt-get remove imagemagick && apt-get autoremove
You can get ImageMagick package here.
➜ wget https://www.imagemagick.org/download/ImageMagick-6.9.10-12.tar.gz
➜ tar xzvf ImageMagick-6.9.10-12.tar.gz
➜ cd ImageMagick-6.9.10-12
Inside ImageMagick source directory run:
➜ ./configure
When the configuration is finished, find the section called Delegate Library Configuration and check if JPEG and PNG support is there. If you see no on the third column you probably don’t have required dependencies like libpng12-dev and libjpeg-dev. You can easily install those using apt-get.
If the configuration is alright, just compile the source:
➜ make
and install:
➜ make install
To confirm that installation finished correctly just run:
➜ convert --version
If you see this error:
convert: error while loading shared libraries: libMagickCore-6.Q16.so.6: cannot open shared object file: No such file or directory
Just run:
➜ ldconfig /usr/local/lib/
ImageMagick has been installed. Now we can start with the fun part 😄
Wrapping ImageMagick into a Swift Package
To use ImageMagick inside Swift code you need to wrap it into a Swift system module package. By exposing header files your Swift code will be able to use all of ImageMagick functions.
Let’s begin by creating a new directory called SwiftImageMagick and initialize new Swift system module using Swift package manager:
➜ mkdir SwiftImageMagick
➜ cd SwiftImageMagick
➜ swift package init --type system-module
Open module.modulemap file. You should see code generated by SPM:
module SwiftImageMagick [system] {
  header "/usr/include/SwiftImageMagick.h"
  link "SwiftImageMagick"
  export *
}
Let’s start with macOS first. Change the name of the module to SwiftImageMagick > SwiftImageMagickMac.
Now, in order to tell how to compile and link all of the packages, you need to use pkg-config tool. You should already have it, if not just use brew to install it:
➜ brew install pkg-config
As I mentioned earlier you need to have PKG_CONFIG_PATH set so pkg-config can find ImageMagick.
➜ pkg-config --list-all | grep -i Magick
You should see a couple of packages:
➜  ~ pkg-config --list-all | grep -i Magick
Magick++              Magick++ - Magick++ - C++ API for ImageMagick (ABI Q16)
Wand-6.Q16            MagickWand - MagickCore - C API for ImageMagick (ABI Q16)
ImageMagick++         ImageMagick++ - Magick++ - C++ API for ImageMagick (ABI Q16)
MagickWand            MagickWand - MagickWand - C API for ImageMagick (ABI Q16)
ImageMagick           ImageMagick - ImageMagick - convert, edit, and compose images (ABI Q16)
MagickCore-6.Q16      MagickCore - MagickCore - C API for ImageMagick (ABI Q16)
Magick++-6.Q16        Magick++ - Magick++ - C++ API for ImageMagick (ABI Q16)
Wand                  MagickWand - MagickCore - C API for ImageMagick (ABI Q16)
MagickWand-6.Q16      MagickWand - MagickWand - C API for ImageMagick (ABI Q16)
ImageMagick++-6.Q16   ImageMagick++ - Magick++ - C++ API for ImageMagick (ABI Q16)
ImageMagick-6.Q16     ImageMagick - ImageMagick - convert, edit, and compose images (ABI Q16)
MagickCore            MagickCore - MagickCore - C API for ImageMagick (ABI Q16)
To find the header file path for ImageMagick:
➜  ~ pkg-config --cflags-only-I MagickWand
-I/usr/local/Cellar/imagemagick@6/6.9.10-12/include/ImageMagick-6
In this directory /usr/local/Cellar/imagemagick@6/6.9.10-12/include/ImageMagick-6 you will find headers for MagickWand: wand/MagickWand.h
And the linker flags:
➜  ~ pkg-config --libs MagickWand
-L/usr/local/Cellar/imagemagick@6/6.9.10-12/lib -lMagickWand-6.Q16 -lMagickCore-6.Q16
Once again, open module.modulemap, add header and link:
module SwiftImageMagickMac [system] {
  header "/usr/local/Cellar/imagemagick@6/6.9.10-12/include/ImageMagick-6/wand/MagickWand.h"
  link "MagickWand-6.Q16"
  link "MagickCore-6.Q16"
  export *
}
Let’s do the same for Linux. You should also have pkg-config on your linux machine, if not just use:
➜ apt-get install pkg-configLet’s check what pkg-config sees:
pkg-config --list-all | grep -i Magick

root@8cc05b6015fc:~# pkg-config --list-all | grep -i Magick
Wand-6.Q16            MagickWand - MagickCore - C API for ImageMagick (ABI Q16)
ImageMagick++-6.Q16   ImageMagick++ - Magick++ - C++ API for ImageMagick (ABI Q16)
MagickWand-6.Q16      MagickWand - MagickWand - C API for ImageMagick (ABI Q16)
ImageMagick           ImageMagick - ImageMagick - convert, edit, and compose images (ABI Q16)
Wand                  MagickWand - MagickCore - C API for ImageMagick (ABI Q16)
ImageMagick-6.Q16     ImageMagick - ImageMagick - convert, edit, and compose images (ABI Q16)
MagickCore            MagickCore - MagickCore - C API for ImageMagick (ABI Q16)
Magick++-6.Q16        Magick++ - Magick++ - C++ API for ImageMagick (ABI Q16)
MagickWand            MagickWand - MagickWand - C API for ImageMagick (ABI Q16)
ImageMagick++         ImageMagick++ - Magick++ - C++ API for ImageMagick (ABI Q16)
Magick++              Magick++ - Magick++ - C++ API for ImageMagick (ABI Q16)
MagickCore-6.Q16      MagickCore - MagickCore - C API for ImageMagick (ABI Q16)
Start with the headers:
root@8cc05b6015fc:~# pkg-config --cflags-only-I MagickWand
-I/usr/local/include/ImageMagick-6
And the linker flags:
root@8cc05b6015fc:~# pkg-config --libs MagickWand
-L/usr/local/lib -lMagickWand-6.Q16 -lMagickCore-6.Q16
To the module.modulemap below macOS part add linux module:
module SwiftImageMagickMac [system] {
  header "/usr/local/Cellar/imagemagick@6/6.9.10-12/include/ImageMagick-6/wand/MagickWand.h"
  link "MagickWand-6.Q16"
  link "MagickCore-6.Q16"
  export *
}

module SwiftImageMagickLinux [system] {
  header "/usr/local/include/ImageMagick-6/wand/MagickWand.h"
  link "MagickWand-6.Q16"
  link "MagickCore-6.Q16"
  export *
}
Remember to remove the dependencies section from Package.swift:
// swift-tools-version:4.2
// The swift-tools-version declares the minimum version of Swift required to build this package.

import PackageDescription

let package = Package(
    name: "SwiftImageMagick"
)
Now when everything is in place don’t forget to create a git repository and commit your changes.
➜ git init
➜ git add .
➜ git commit -m "Initial commit."
Now our package is ready. Let’s use it 😄
How to use ImageMagick with Swift
Now let’s create simple test app that will import the ImageMagick library and create 100x100px image filled with a red background, just to be sure that our package is working.
➜ mkdir MagicTest
➜ cd MagicTest
➜ swift package init --type executable

Creating executable package: MagicTest
Creating Package.swift
Creating README.md
Creating .gitignore
Creating Sources/
Creating Sources/MagicTest/main.swift
Creating Tests/
Creating Tests/LinuxMain.swift
Creating Tests/MagicTestTests/
Creating Tests/MagicTestTests/MagicTestTests.swift
Creating Tests/MagicTestTests/XCTestManifests.swift
SPM will create the basic structure for you; --type executable will tell SPM to create a command line tool.
First of all, you need to add SwiftImageMagick as a dependency to Package.swift. You can add it as path to your local git repository:
// swift-tools-version:4.2
// The swift-tools-version declares the minimum version of Swift required to build this package.

import PackageDescription

let package = Package(
    name: "MagicTest",
    dependencies: [
        .package(url: "../SwiftImageMagick", .branch("master")),
    ],
    targets: [
        .target(
            name: "MagicTest",
            dependencies: []),
        .testTarget(
            name: "MagicTestTests",
            dependencies: ["MagicTest"]),
    ]
)
Compile it to be sure that your dependency is reachable:
➜  MagicTest swift build
Fetching /Users/mike/Documents/projects/playground/SwiftImageMagick
Completed resolution in 0.35s
Cloning /Users/mike/Documents/projects/playground/SwiftImageMagick
Resolving /Users/mike/Documents/projects/playground/SwiftImageMagick at master
'SwiftImageMagick' /Users/mike/Documents/projects/playground/MagicTest/.build/checkouts/SwiftImageMagick-2878331876767139303: warning: system packages are deprecated; use system library targets instead
Compile Swift Module 'MagicTest' (1 sources)
Linking ./.build/x86_64-apple-macosx10.10/debug/MagicTest
If you are using Swift 4.2 you will also see the following: warning: system packages are deprecated; use system library targets instead - this is related to System Library Targets.
Then, inside main file of your app (./Sources/MagicTest/main.swift) remove everything and import ImageMagick library.
#if os(Linux)
import SwiftImageMagickLinux
#else
import SwiftImageMagickMac
#endif
You can tell if you program is running on Linux or on macOS by using Swift build configuration import test.
Now to compile the app you also need to provide the path to headers and linker, the same one that you got last time using pkg-config. It’s also a good idea to check if there are any other flags that you need to provide:
➜  MagicTest pkg-config --cflags-only-other ImageMagick
-DMAGICKCORE_HDRI_ENABLE=0 -DMAGICKCORE_QUANTUM_DEPTH=16
Let’s add them all up:
➜ swift build -Xswiftc -I/usr/local/Cellar/imagemagick@6/6.9.10-12/include/ImageMagick-6 -Xlinker -L/usr/local/Cellar/imagemagick@6/6.9.10-12/lib -Xlinker -lMagickWand-6.Q16 -Xlinker -lMagickCore-6.Q16 -Xcc -DMAGICKCORE_HDRI_ENABLE=0 -Xcc -DMAGICKCORE_QUANTUM_DEPTH=16
Fetching /Users/mike/Documents/projects/playground/SwiftImageMagick
Completed resolution in 0.35s
Cloning /Users/mike/Documents/projects/playground/SwiftImageMagick
Resolving /Users/mike/Documents/projects/playground/SwiftImageMagick at master
'SwiftImageMagick' /Users/mike/Documents/projects/playground/MagicTest/.build/checkouts/SwiftImageMagick--9014361064470696861: warning: system packages are deprecated; use system library targets instead
Compile Swift Module 'MagicTest' (1 sources)
Linking ./.build/x86_64-apple-macosx10.10/debug/MagicTest
Success! 😄 Library is working, now let’s create an Xcode project file and add some code.
➜ swift package generate-xcodeprojRun ./MagicTest.xcodeproj using Xcode 10.
When you try to compile it using Xcode you will see the same error as you had in the terminal:

It’s actually very easy to fix. Just open Build settings and find Header search path and add the path:

Do the same for Library search path:
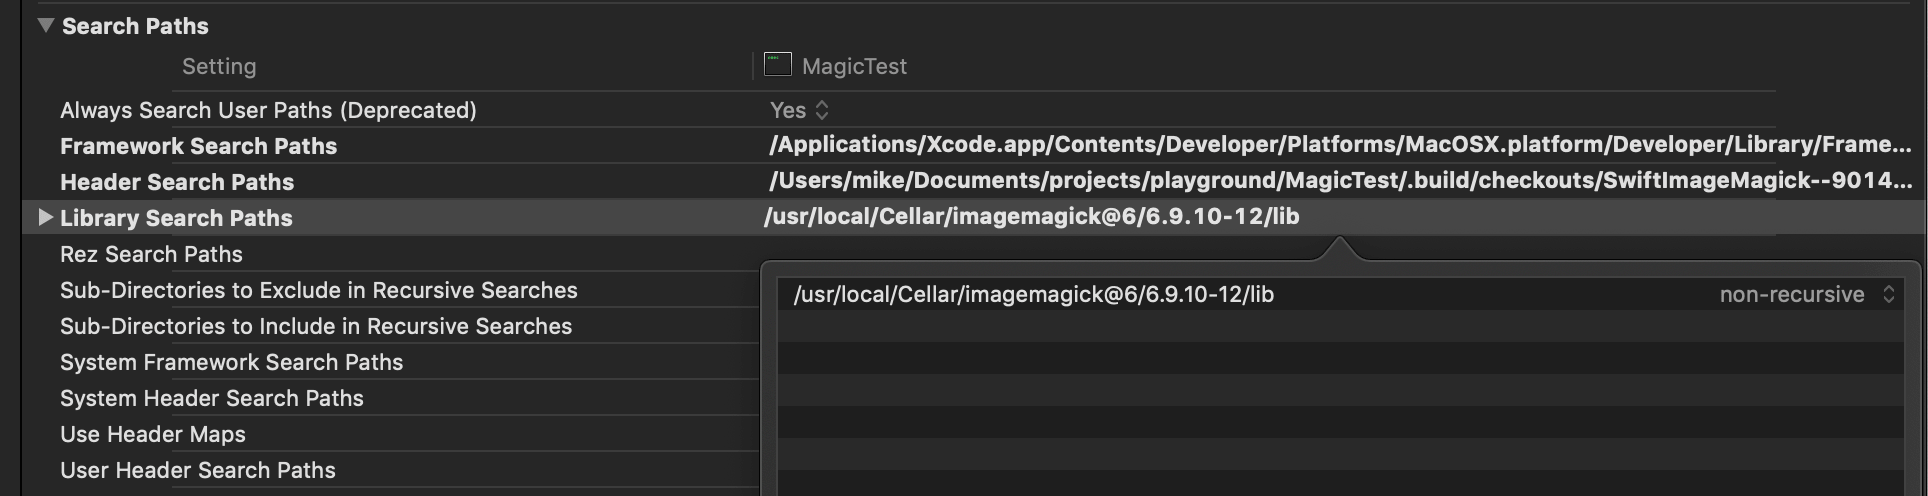
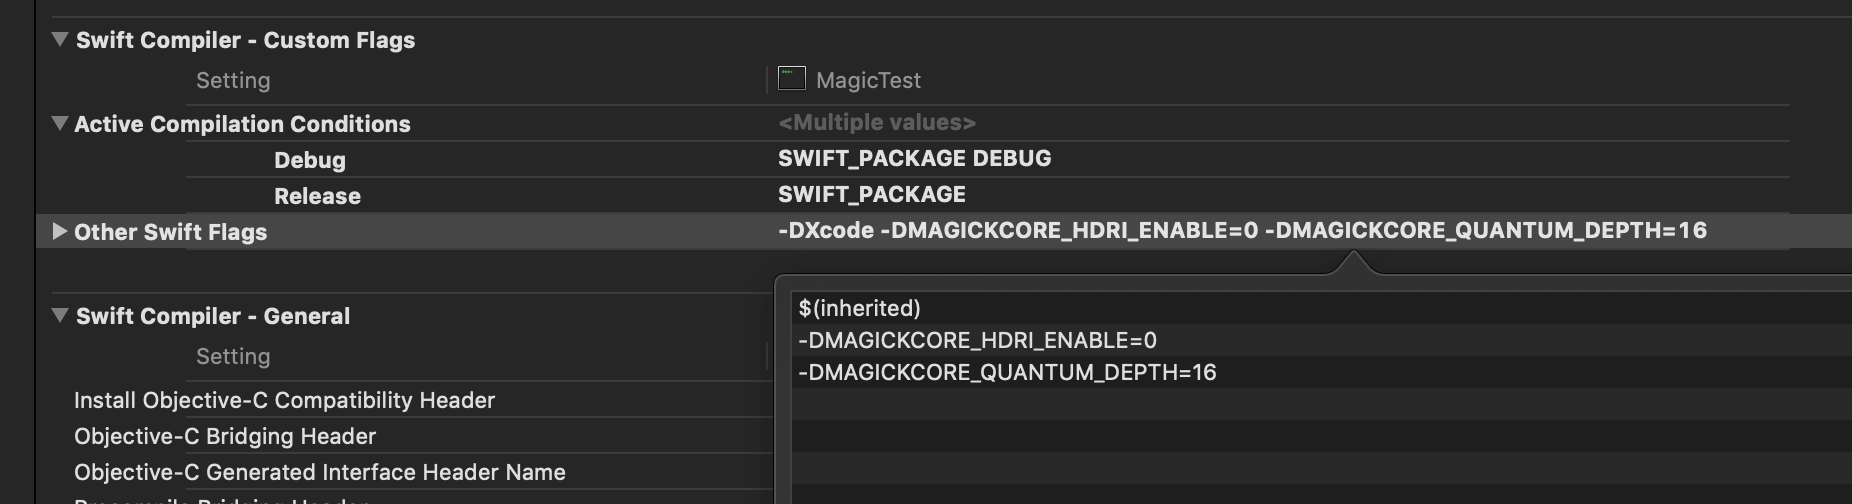
Don’t forget to add Other Swift Flags:
Hit Cmd + R and everything should compile and run without any warnings.
Of course, all of these changes will be gone when you would like to regenerate xcodeproj again in the future. You can use xcconfig to store them but be aware that there are some weird issues with Xcode 10 (bug reported on radar).
Create a new file: Package.xcconfig
LIBRARY_SEARCH_PATHS = /usr/local/Cellar/imagemagick@6/6.9.10-12/lib
HEADER_SEARCH_PATHS = /usr/local/Cellar/imagemagick@6/6.9.10-12/include/ImageMagick-6
OTHER_SWIFT_FLAGS = -Xcc -DMAGICKCORE_HDRI_ENABLE=0 -Xcc -DMAGICKCORE_QUANTUM_DEPTH=16
Then generate the xcode project file:
➜ swift package generate-xcodeproj --xcconfig-overrides Package.xcconfigThe project should now compile without any errors or warnings.
When you have a properly working xcode project, open once again: Sources/MagicTest/main.swift
Below ImageMagick import add this:
MagickWandGenesis()

let wand = NewMagickWand()
let pixel = NewPixelWand()
MagickWandGenesis initializes the MagickWand environment. You also need to terminate the environment after you finish work. NewMagickWand creates new wand resource that represents a structure which contains image. NewPixelWand creates new pixel wand which is responsible for color manipulation.
PixelSetColor(pixel, "red")
MagickSetBackgroundColor(wand, pixel)
PixelSetColor will set the color of the pixel wand. Use name - "red", hex value #FF0000 or rbg - rgb(255,0,0). You can even use “transparent” to make a transparent background if you save it as png.
Now, when color is applied to the wand, just create a new image and save it:
MagickNewImage(wand, 100, 100, pixel)
MagickWriteImage(wand, "test.jpg")
You can also provide the absolute path to the image, but if you don’t do so remember that the file will be created in Xcode DerivedData catalog.
It’s almost done: just release memory for the wand, pixel and terminate the environment:
DestroyMagickWand(wand)
DestroyPixelWand(pixel)
MagickWandTerminus()
Now run the application. I have uploaded the whole sample app to the GitHub.
If you didn’t provide the absolute path for the file, you can just open Products, select program name and click Show in Finder. You will find test.jpg there:
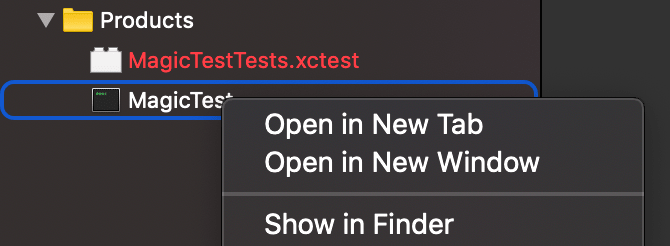
The test.jpg should looks like this:

So the ImageMagick is working fine. Let’s create new Vapor app and add watermark text 😄
At the beginning of this post I thought that I would create a helper library for image manipulation but this post is already too long so let’s just keep it simple and use ImageMagick commands inside Vapor. Library for image manipulation will be a good topic for the next post 😉
Serving watermarked photos in Vapor
This one will be pretty simple, just create a new Vapor project:
➜ vapor new WatermarkPhotosBy default, vapor new will create a project based on the api template. Right now, you need to add the ImageMagick wrapper dependency. It’s a good idea to update Swift version to 4.2 and Vapor to 3.1.0 if it’s still on 3.0.0 in your Package.swift file:
// swift-tools-version:4.2
import PackageDescription

let package = Package(
    name: "WatermarkPhotos",
    dependencies: [
        // 💧 A server-side Swift web framework.
        .package(url: "https://github.com/vapor/vapor.git", from: "3.1.0"),

        // 🔵 Swift ORM (queries, models, relations, etc) built on SQLite 3.
        .package(url: "https://github.com/vapor/fluent-sqlite.git", from: "3.0.0"),

        // 🎨 ImageMagick wrapper
        .package(url: "https://github.com/mikina/SwiftImageMagick", .branch("master"))
    ],
    targets: [
        .target(name: "App", dependencies: ["FluentSQLite", "Vapor"]),
        .target(name: "Run", dependencies: ["App"]),
        .testTarget(name: "AppTests", dependencies: ["App"])
    ]
)
Generate the Xcode project file and open it:
➜ cd WatermarkPhotos/
➜ vapor xcode -y
It may take a while as it has to fetch all of the dependencies.
At this point you have everything you need to get started. Let’s write a very simple test. It’s hard to compare image to image, as it would make your tests flaky, so let’s just check if watermark endpoint response is:
- Returning status code
200 .ok - Content type is set to
image/jpeg - Content length is greater than zero
Create a new test file: /Tests/AppTests/PhotoTests.swift
import XCTest
@testable import Vapor
@testable import App

final class PhotoTests: XCTestCase {

}
Unfortunately, Vapor 3.1 doesn’t have any helpers for tests yet, but you can use some of the extensions that are used to test Vapor itself. You can find those here.
Create a new tests helper: /Tests/AppTests/TestsHelper.swift and copy this private application extension. Don’t forget to make it public so other tests can see it. It should look like this.
Now go back to PhotoTests.swift and add this simple test:
import XCTest
@testable import Vapor
@testable import App

final class PhotoTests: XCTestCase {
  func testGetWatermakedPhoto() throws {
    let app = try Application.makeTest(routes: routes)

    try app.test(.GET, "/photos/show/barcelona") { response in
      XCTAssertEqual(response.http.status, .ok)
      XCTAssertEqual(response.http.contentType, MediaType.jpeg)
      let length = response.http.headers["content-length"].first!
      XCTAssertGreaterThan(Int(length)!, 0)
    }
  }

  static let allTests = [
    ("testGetWatermakedPhoto", testGetWatermakedPhoto)
  ]
}
Of course, this test will fail right now because there is no photo controller yet, so let’s go and create one.
Create file: /Sources/App/Controllers/PhotoController.swift
import Vapor
import Foundation

final class PhotoController {
  func show(_ req: Request) throws -> Response {
    return Response(using: req)
  }
}
Also, add the route for it in: /Sources/App/routes.swift
import Vapor

/// Register your application's routes here.
public func routes(_ router: Router) throws {
    // Photos controller
    let photoController = PhotoController()
    router.get("photos", "show", String.parameter, use: photoController.show)
}
If you are not familiar with routes, String.parameter means that you can pass a string value inside the route and it will be available as request parameters inside the controller.
Your photos url will looks like this:
http://localhost:8080/photos/show/barcelonaAt this point it’s just responding with an empty page. Let’s go back to /Sources/App/Controllers/PhotoController.swift and add some code.
In a real life application you would keep a list of photos in a database and actual files inside external storage like S3 on AWS. But for this demo let’s keep it simple, just create new directory called photos inside the main project directory and add some photos there.
Inside PhotoController.swift add photos list:
private let photosList = ["barcelona.jpg", "oslo.jpg", "porto.jpg", "rome.jpg"]
private let photosDirectory = "photos"
You can get the photo name from request parameters:
let name = try req.parameters.next(String.self)
let filename = name.lowercased().appending(".jpg")
Just check if the file is on the list:
guard photosList.contains(filename) else {
  throw Abort(.notFound, reason: "Photo not found")
}
Before adding the watermark to the photo, let’s just load it from the disk and send it as a response.
In Vapor 3.1 there is a DirectoryConfig struct which can help you get the path to the working directory.
let directory = DirectoryConfig.detect()
let workingDirectory = URL(fileURLWithPath: directory.workDir)
Caveat:
When you will be running the app through Xcode there is one thing that you need to do. If you have checked DirectoryConfig you probably saw that there is a function for directory detection: detect(). There is a conditional compilation flag: #if Xcode
You need to define it in Active Compilation Conditions:

Or just add it to Package.xcconfig:
SWIFT_ACTIVE_COMPILATION_CONDITIONS[config=Debug] = XcodeAnd generate the xcodeproject file:
➜ swift package generate-xcodeproj --xcconfig-overrides=Package.xcconfigOf course it will not affect a linux build.
You are almost there. Now create Data with contents of the file and return it as jpeg response:
let data = try Data(contentsOf: workingDirectory.appendingPathComponent(photosDirectory, isDirectory: true).appendingPathComponent(filename))
return req.response(data, as: .jpeg)
PhotoController at this point will look like this:
func show(_ req: Request) throws -> Response {

  let name = try req.parameters.next(String.self)
  let filename = name.lowercased().appending(".jpg")

  guard photosList.contains(filename) else {
    throw Abort(.notFound, reason: "Photo not found")
  }

  let directory = DirectoryConfig.detect()
  let workingDirectory = URL(fileURLWithPath: directory.workDir)

  let data = try Data(contentsOf: workingDirectory.appendingPathComponent(photosDirectory, isDirectory: true).appendingPathComponent(filename))
  return req.response(data, as: .jpeg)
}
Run the application in Xcode and open the url:
http://localhost:8080/photos/show/barcelona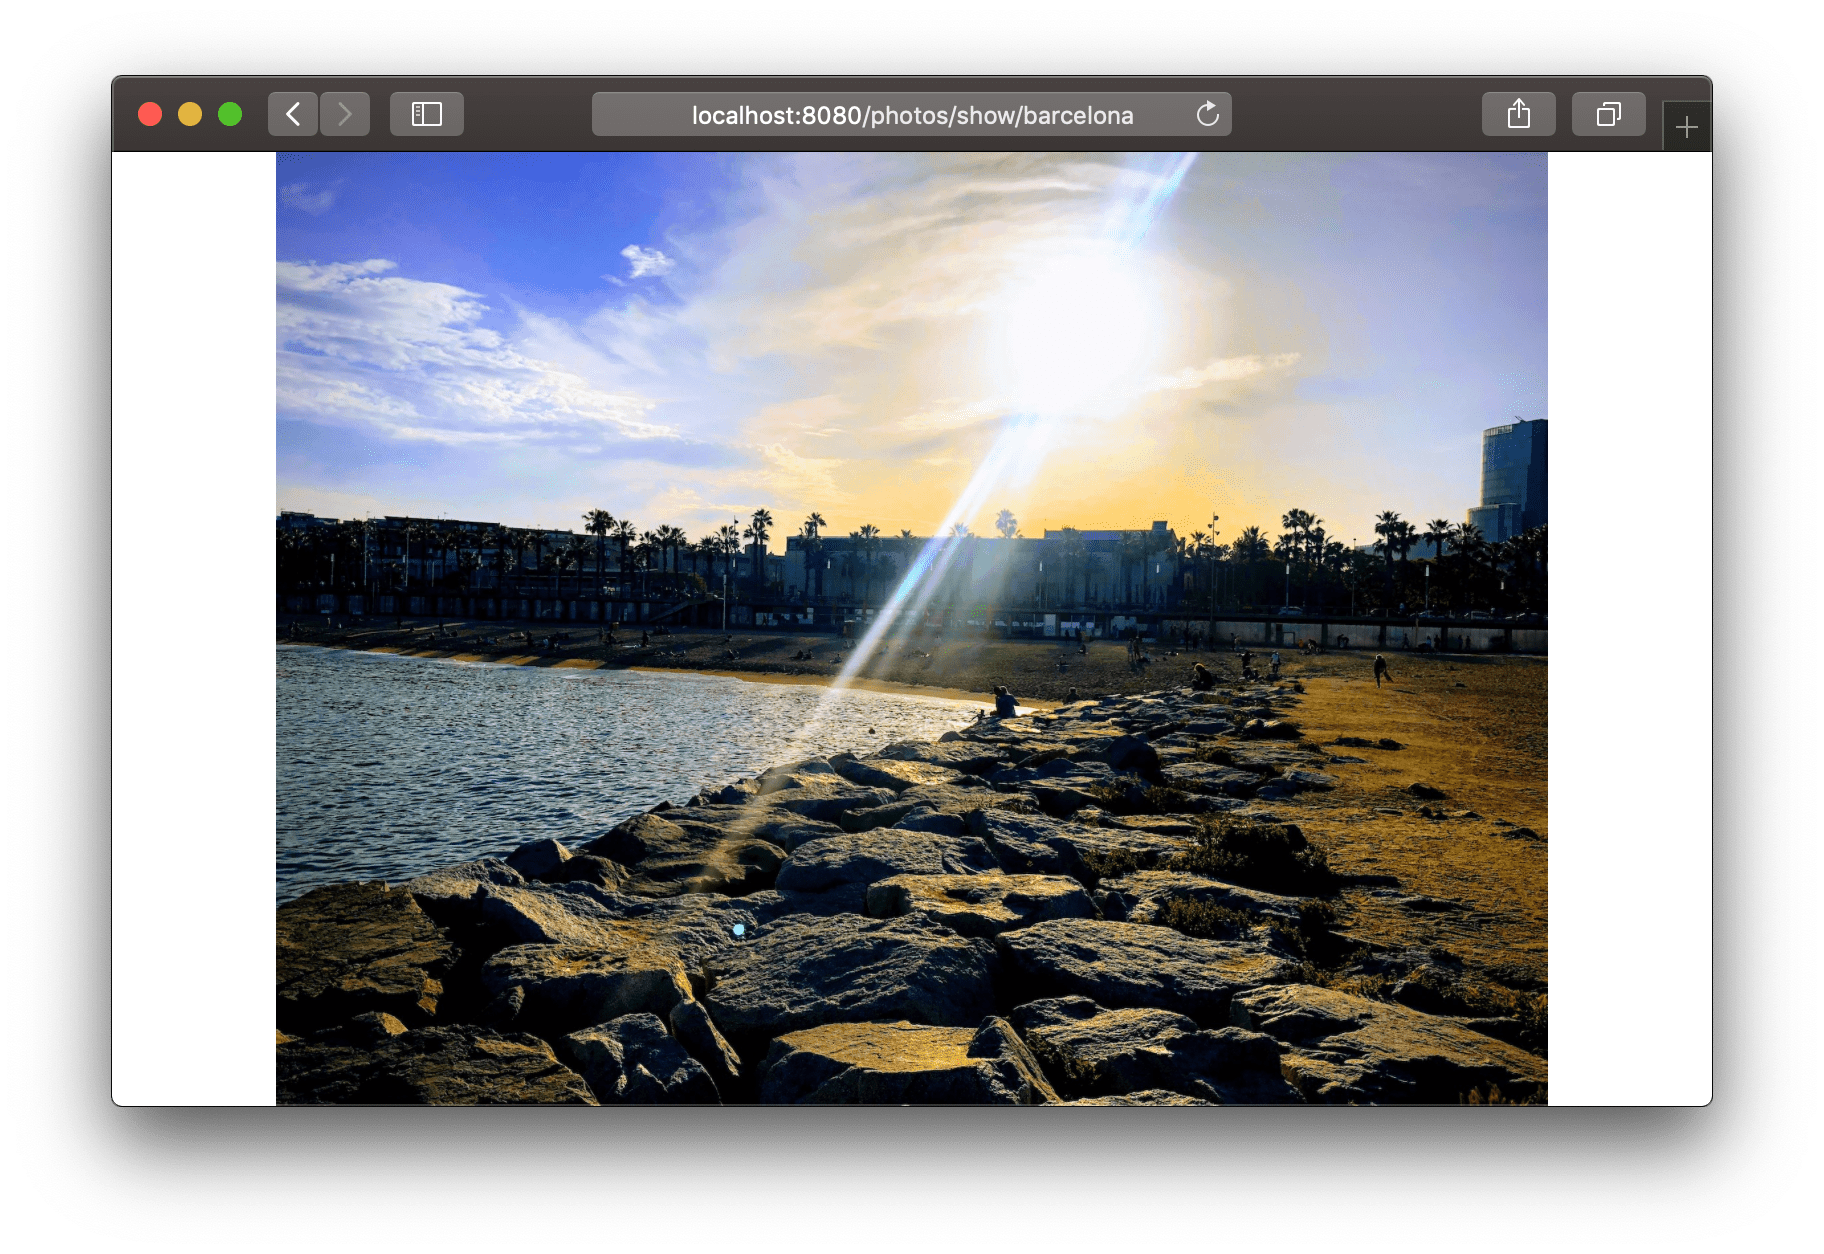
It’s time for the final step: adding the watermark.
Create the model file: /Sources/App/Models/Photo.swift
Import Vapor, Foundation and ImageMagick headers as you did in sample project:
#if os(Linux)
import SwiftImageMagickLinux
#else
import SwiftImageMagickMac
#endif

import Vapor
import Foundation
You will probably see an error like:
'magick/magick-config.h' file not foundThis is the same error as you had in sample app. Just add Package.xcconfig and regenerate xcode project file:
swift package generate-xcodeproj --xcconfig-overrides=Package.xcconfigCreate class Photo with a file property:
final class Photo {
  private let file: URL

  init(file: URL) throws {

    guard FileManager.default.fileExists(atPath: file.path) else {
      throw Abort(.internalServerError, reason: "Photo file not found")
    }

    self.file = file
  }
It’s a good idea to check if the file exists, as error reporting from ImageMagick is not always the best.
Now create a function that will return the watermarked photo:
public func watermarked(with font: URL, and text: String) throws -> Data {

  guard FileManager.default.fileExists(atPath: font.path) else {
    throw Abort(.internalServerError, reason: "Font file not found")
  }
It takes the url to the font file that will be used and the watermark text as input.
Prepare magic stack:
MagickWandGenesis()

let wand = NewMagickWand()
let pixel = NewPixelWand()
let draw = NewDrawingWand()
I have already described those methods. What’s new here is the drawing wand: it will be used to draw on the image, or in this case to attach watermark text to the image.
Load the image into Magick Wand:
MagickReadImage(wand, file.path)And prepare the drawing wand:
PixelSetColor(pixel, "white")
DrawSetFillColor(draw, pixel)
DrawSetFont(draw, font.path)
DrawSetFontSize(draw, 70)
DrawSetGravity(draw, CenterGravity)
DrawAnnotation(draw, 0, 0, text)
This is pretty straight forward; The pixel wand is being set to white color and attached to the drawing wand. Font, gravity parameter and size are also applied to the drawing wand. DrawAnnotation is attaching watermark text to the drawing wand.
What’s worth mentioning here is that you can set different gravity. Gravity is telling ImageMagick where it should put the drawing so you don’t have to calculate this. Using CenterGravity will draw the watermark text in the center of an image. Setting it to SouthWestGravity will draw the watermark in bottom left corner. There is no need to calculate the bounding box and positioning on the screen manually.
Draw the watermark text:
MagickDrawImage(wand, draw)You also need to set the image format and compression quality before getting the data:
MagickSetImageCompressionQuality(wand, 85)
MagickSetImageFormat(wand, "jpg")
To get the data from ImageMagick just call MagickGetImageBlob:
var length = 0

guard let image = MagickGetImageBlob(wand, &length) else {
  throw Abort(.internalServerError, reason: "Can't get image from ImageMagick.")
}
MagickGetImageBlob will return UnsafeMutablePointer<UInt8> and all you have to do is create Data using bytes:
let data = Data(bytes: image, count: length)Don’t forget to clean up and return the data:
DestroyMagickWand(wand)
DestroyPixelWand(pixel)
DestroyDrawingWand(draw)
MagickRelinquishMemory(image)
MagickWandTerminus()

return data
Your model is all good now. Let’s go back to the controller and use it.
Before using your model, you need to download the font that will be used for creating the watermark. You can get a lot of different fonts from the GoogleFont library. I’m using Open Sans. Just download the ttf file and put it inside the fonts directory inside your project.
In PhotoController.swift, add the property for the font directory and the property for the watermark text:
final class PhotoController {

private let photosList = ["barcelona.jpg", "oslo.jpg", "porto.jpg", "rome.jpg"]
private let photosDirectory = "photos"
private let fontsDirectory = "fonts"
private let watermarkText = "ImageMagick\nVapor"
Inside the show(_ req: Request) function, replace current photo loading with your Photo model:
let file = workingDirectory.appendingPathComponent(photosDirectory, isDirectory: true).appendingPathComponent(filename)
let font = workingDirectory.appendingPathComponent(fontsDirectory, isDirectory: true).appendingPathComponent("OpenSans-Regular.ttf")

let photo = try Photo(file: file)
let watermarkedPhoto = try photo.watermarked(with: font, and: watermarkText)
The whole PhotoController should look like this.
Now run the application in Xcode and open the url once again:
http://localhost:8080/photos/show/barcelona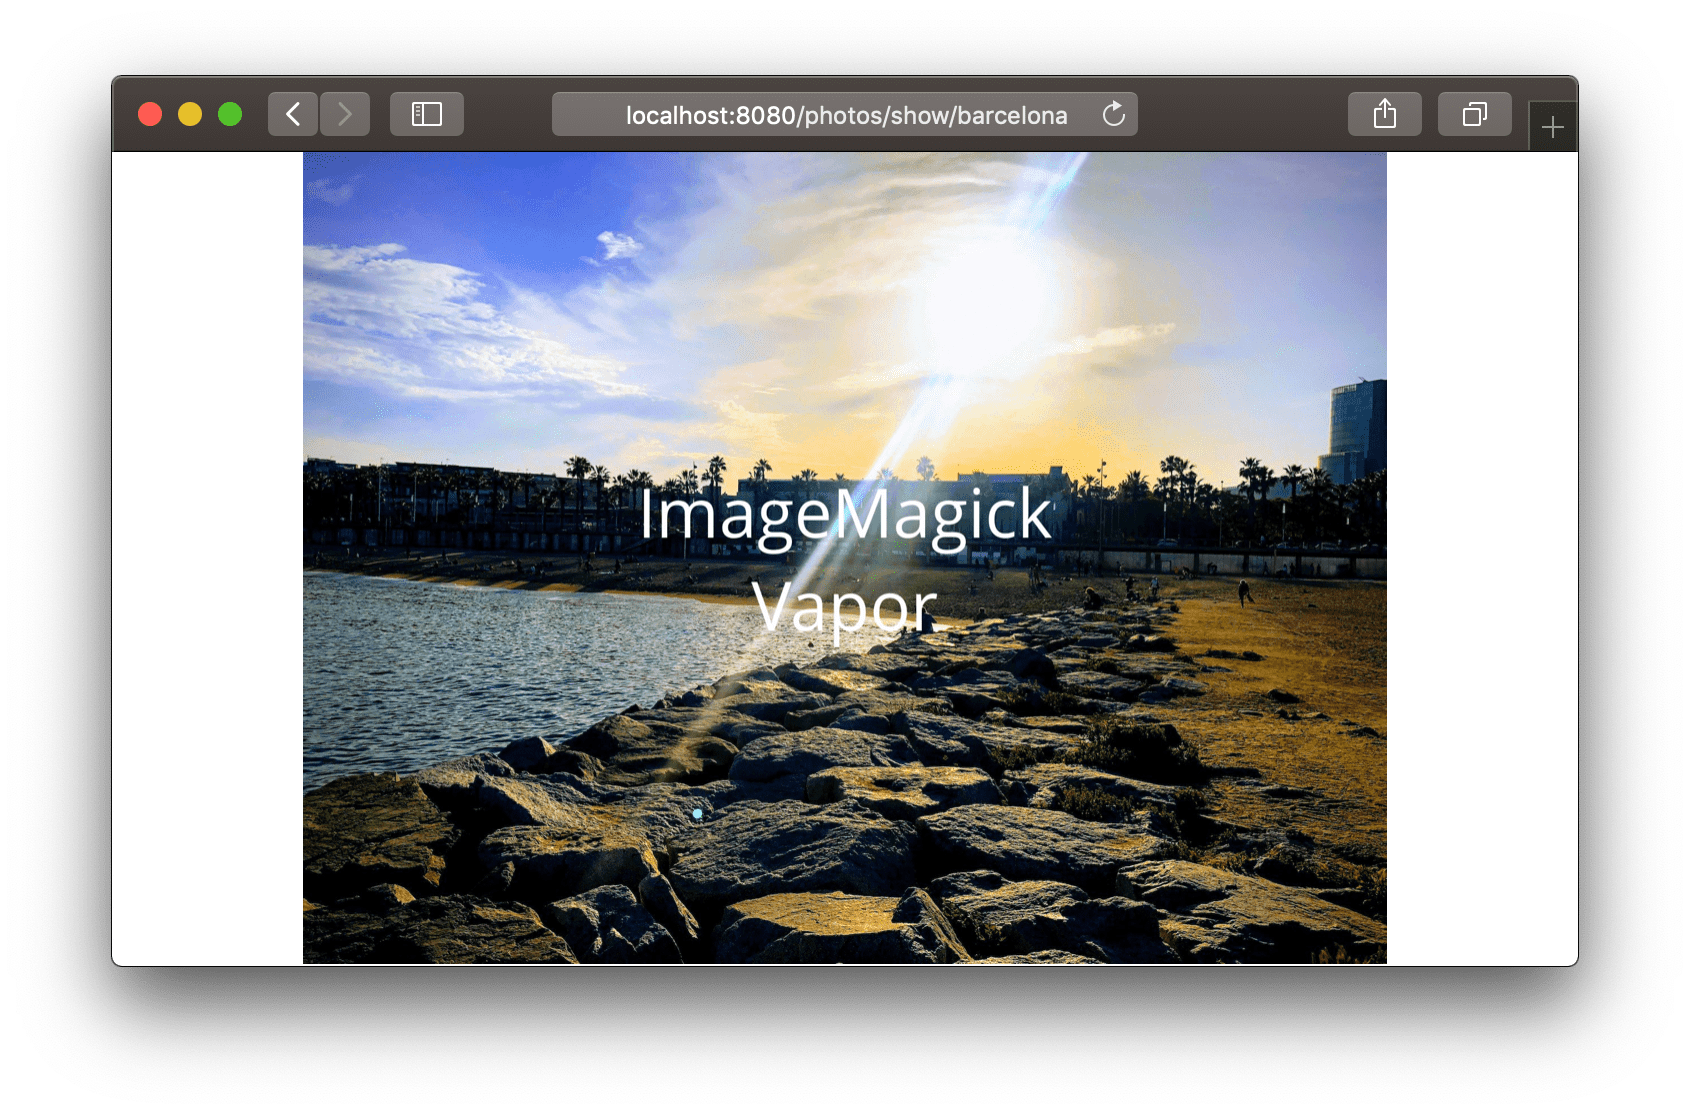
Summary
When I recently tried to use ImageMagick in my Vapor project, I spent a couple of hours trying to figure out how to setup and wrap ImageMagick into a Swift package. I had a lot of issues with missing files and linker errors. After resolving all of those issues, using ImageMagick turns out to be very simple and straightforward 😄
Where do we go from here?
I strongly encourage you to play with ImageMagick. You can create a very handy and tailored library that you can re-use in your Vapor projects.
You should also try to run it on Linux if you haven’t tried it yet. I’m using Docker for development and I will be writing how to use it with Vapor in my next blog post.
How did you like it? Have you already tried using ImageMagick with Vapor? Did you run into any issues? Let me know - along with your questions, comments or feedback - on Twitter @mikemikina
Happy coding 😊